An Introduction
Before reading this post, I must point out that Priest is unlike any other, and is very different to the stained glass panels typically brought to a conservator for treatment. In conservation, every window is assessed individually, and rather than there being a universal ‘one size fits all’ approach, they are treated according to their own specific condition. When Priest arrived in the studio, it was in a very poor condition. It was very unstable, and without treatment, would have been unlikely to last much longer in its existing state. Indeed, pieces of glass had already long-since detached from the plaster support structure, which itself was cracking and had slowly buckled. The instability of Priest meant that as soon as conservation treatment started, it was obvious that this was a panel that would require more than the ideal approach of ‘minimum intervention’, in order to prolong its life into the future. Therefore, the treatment that Priest received is as individual as the panel itself, and is far from the typical approach to the conservation of stained glass. This is something that must be borne in mind whilst reading this post.
Removing the Plate and Cleaning the Glass
The first step in the process of conserving Priest, was to make a cradle that would support the panel, so that it could be laid flat. This cradle was propped up against the inside of the panel, and the whole thing was swiftly – but gently – laid down, so that the exterior faced upwards, in order to access the broken glass backing plate. The nails holding the plate in position were bent so that the two parts of the plate could be removed from the panel.

Detail of the exterior of the panel after the removal of one part of the glass backing plate – Exterior Side – ‘Priest’.
Once on the bench, and ensuring that the fragile painted design on the glass was not disturbed, the thick, sticky dust was removed from the surface using a mixture of ethanol and de-ionised water, applied on cotton wool swabs. These were rolled across the surface, ensuring that they did not touch the paint. A gap of a few millimeters was left all around the boundary of the friable paint lines to make sure that it did not come into contact with the cleaning solution. This was all done whilst looking through a microscope, which ensured maximum precision. The edges of the glass along the break in the plate were cleaned thoroughly, again being mindful of the paint on one side, and the two pieces were adhered back together with silicone. This adhesive has a certain degree of flex to it, and so was suitable here due to the scale of the glass sheet and the length of the crack within it – anything more solid – such as an epoxy resin – would have created too much tension in the glass.

Nail bent to facilitate the removal of the glass backing plate – Exterior side – ‘Priest’.
Where some pieces of coloured glass had remained within the plaster matrix, those that had fallen to the bottom of the panel and become wedged between it and the blacking plate were photographed, and then removed into a separate tray. This left the plaster visible, and it was possible to see the many empty gaps where glass should be. The plaster was given a light clean using a soft brush and a low suction vacuum, which had a pair of tights wrapped around the nozzle in order to catch all of the dirt and any loose plaster that came up with the suction. Following this, each of the individual coloured glass pieces was then cleaned with a mixture of ethanol and de-ionised water, on cotton wool swabs. This removed the build up of dust and grease, and left them clean and ready to be re-attached to the plaster. The same was done with the pieces of glass that remained within the plaster matrix.

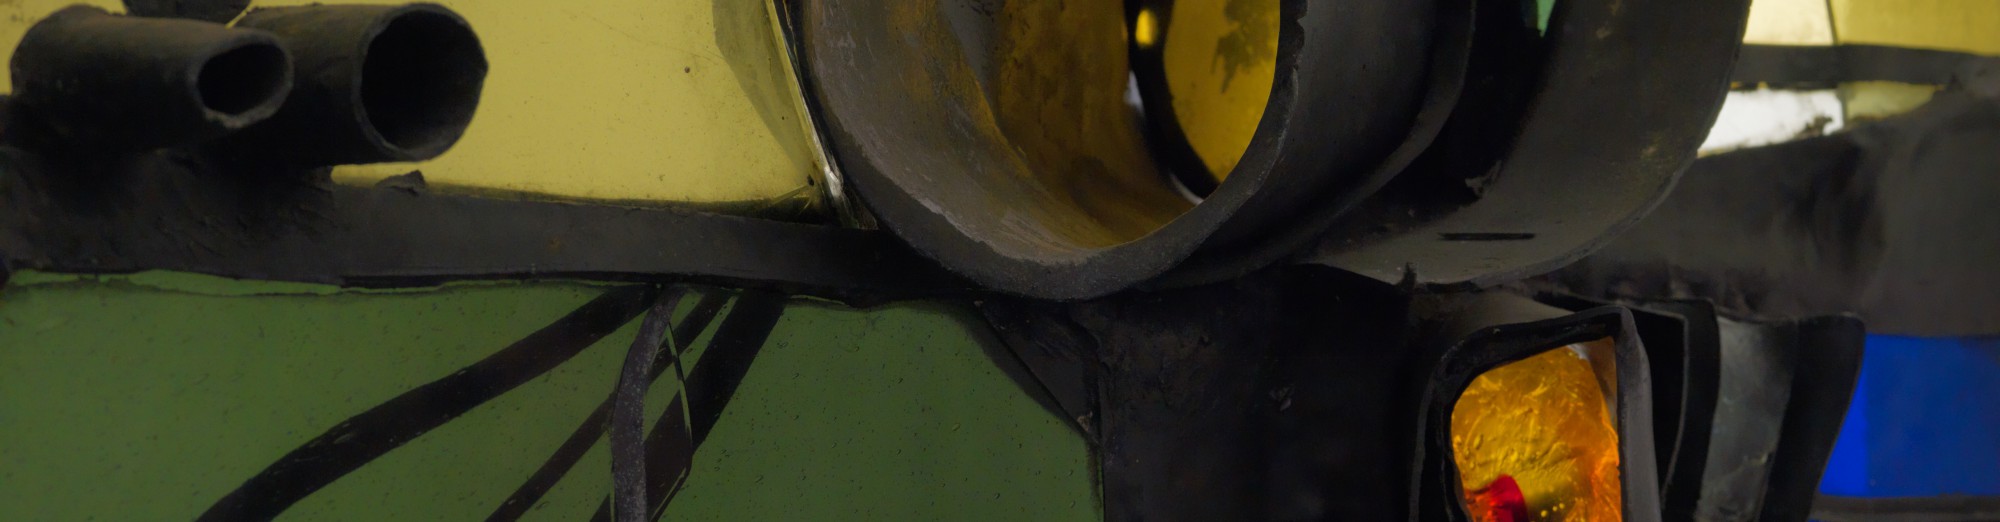
After the coloured glass pieces had been returned to their original positions – Exterior Side – ‘Priest’.

Detail of the reinstated glass – Exterior Side – ‘Priest’.
Consolidating the Plaster Matrix
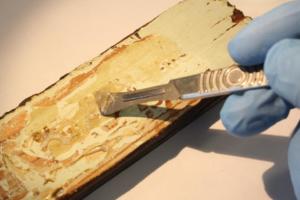
Now that the back of the panel had been exposed from underneath the backing plate, it became apparent that the plaster was in worse condition than originally thought. Without the obstruction of the plate, it was possible to see the extent of the cracking, and the relatively large widths that some of these cracks had reached. Before the pieces of coloured glass were reinstated, it was first necessary to fill these cracks with an adhesive. Paraloid B72 was chosen, and was applied to the cracks with a scalpel, which trickled into them in a capillary action. For those areas with wider gaps, the Paraloid was mixed with glass microballoons, and this provided a filler that would ensure that the plaster was bonded together and remained stable.

Consolidating cracks in the plaster – Exterior Side – ‘Priest’.
Reattaching the Glass Pieces
After assessing the glass at close proximity, without the backing plate acting as a barrier – it was evident that the glass would need more to secure it than previously intended. The pieces of glass that were still attached to the plaster matrix were generally quite loose, and were likely to fall away from the panel in the near future without a form of barrier to catch them. To solve this problem, we began to look towards the use of fabric as a means of securing the glass, and ensuring that even if it did come loose, it would not fall away from the panel. The stained glass conservators at the Burrell Collection in Glasgow had performed some valuable tests that focused on the use of fabrics as an alternative method of consolidating fractured glass, and so inspiration was taken from here for this project. Information about their investigations can be found on their blog here: https://boppardconservationproject.wordpress.com/2014/06/25/repairing-fractures-ii/
We determined that a fabric called polyester stabiltex would be used in one piece across the entire reverse of Priest, to act as a form of ‘safety net’ for the glass. The weave of this fabric is visible from the reverse of the panel, and if it is viewed at close proximity from the interior, but bends in well enough not to be distracting, especially in areas where there are multiple pieces of glass layered within the plaster matrix. Trials were undertaken of the performance two potential adhesives, in which to attach the fabric. These were Klucel G – a wheat starch paste – and Paraloid B72 – a thermoplastic resin. Though Klucel G adhered well to the glass, and left very minimal visual impact, it did not adhere to the plaster, which was a big problem for this panel. Therefore, though the Paraloid B72 did leave a slight white cast in some areas on the surface of the glass, it adhered well to the plaster (as we have already found out) and from tests carried out it was confirmed that it could be relied upon to remain stable over time. Similarly, another test was undertaken to see how plaster responded to being submerged in the liquids necessary to remove Paraloid B72 and Klucel G. Fortunately, it was acetone – that needed to remove the Paraloid B72 – that caused the least amount of changes in the plaster. Water was the other option – which would remove the Klucel G, however this slightly softened the plaster after an hour. These tests were not exactly representative of the actual fabric removal process, as the panel would not need to be soaked with liquid in order to remove the adhered fabric, rather than lightly brushed with a dampened brush. Regardless of this different, it was informative to see the results, and beneficial to see that the removal of Paraloid B72 would not cause substantial damage to the plaster.
Before applying the polyester stabiltex, the coloured glass pieces of glass were first adhered to the plaster matrix with small dabs of Paraloid B72. Following this, the fabric was laid over the reverse of the panel and the adhesive was applied with a paintbrush.

Applying the Paraloid B72 to the polyester stabiltex – Exterior Side – ‘Priest’.

Polyester stabiltex on the exterior side of the panel – Exterior Side – ‘Priest’.
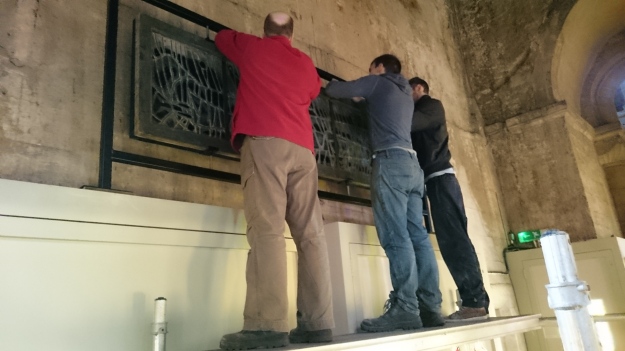
Returning the Backing Plate
The final task before the panel could be stood back upright was to reattach the backing plate. It became apparent that the old nails would not provide enough support to ensure that the glass plate would stay in position in the long-term, and so another solution had to be sought. Similarly, the plaster structure itself was not directly fitted into the outer wooden frame, but was actually placed inside a smaller, inner frame, which itself was only attached to the main frame by small sections of plaster, of which some had broken. Therefore, the inherent fragility of the plaster was made more precarious by the instability of the framing system. To solve this dilemma, a more invasive approach that originally desired had to be implemented. This was justified by the fact that without it, the panel’s lifespan would be drastically reduced, and also that despite the necessity for new screw holes having to be drilled into the wooden frame; these holes would be the only direct impact on the original fabric. These holes were also much more desirable than the irretrievable loss from collapse that the panel could face without the stabilisation treatment. The frame was secured by creating a small number of brackets, that were made from manganese bronze, bent into an ‘L’ shape. Each of the two sides had a hole punched through it, and then these were screwed into the wood – one side on the outer frame, and one on the interior frame, so that the inner frame was secured and no longer moved within the outer frame, jeopardising the panel.

Detail of the reverse of ‘Priest’ before the new black card strips were added. Note the brackets holding the inner and outer wooden frames together, and also those holding the backing plate in position – Exterior Side – ‘Priest’.
In order to secure the glass backing plate, the same kind of brackets were created, but this time, only one side was drilled with a hole, and the other was surrounded by plastazote – an inert foam used frequently in conservation as a packing and storage material. One end of the brackets were screwed into the frame, and the plastazote end rested against the glass backing plate – sufficiently enough to support it from loss or movement, but gently enough not to put any pressure on the glass. The brackets were also positioned to avoid contact with any of the fragile paint on the plate.

Bespoke bracket holding the glass backing plate in position – Exterior Side – ‘Priest’.
The Frame
The frame was then cleaned with a smoke sponge, which is a form of cleaning apparatus used in conservation – notably that of fire damaged objects. This is made from vulcanized rubber that absorbs dust as it is gently drawn across the surface of an object. The beading on the front of the frame that had come loose was reattached using Paraloid B72, as fixing it back in position with nails would cause too much stress to the panel, due to the requirement of using a hammer to insert them.
The final task for the exterior side of the panel was to remove the black paper around the perimeter. This had acted as a barrier to stop light coming through around the plaster. Over time some of this had been lost, and the remaining paper had weakened and become thin and liable to tearing. The decision was made for this to be removed, and retained for archiving, and a new, sturdier black card reinstated in its place, and in that of the missing card.
Conserving the Interior face of the panel
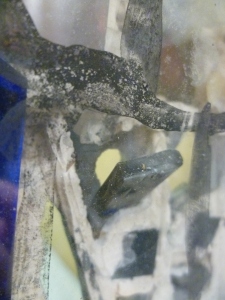
Due to the panel having been laid flat and then erected back into a vertical position, some pieces of loose plaster inevitably fell away from the interior side of the panel. Most of these areas were reattached using the same adhesive, as before, however for a small number of tiny pieces that fell away, their positions remained unidentified. It was not felt that there was justification to attach them ‘at random’ and so they have been retained for archiving. The repair around the nose was one of the pieces that had detached – but due to the crumbling nature of the repair material, it was not possible to reinstate it to the panel. Again, this has been retained for archiving, and the glass is the nose has been positioned to fit without the later repair addition. Cracks in the plaster were consolidated, and the visible areas of coloured glass cleaned from this side.

Old repair to the nose of the figure, now archived – Interior Side – ‘Priest’.
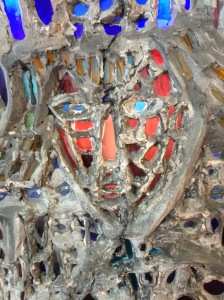
Detail of the nose after conservation. Note the original plaster revealed after the archiving of the repair compound – Interior Side – ‘Priest’.
In Conclusion
The conservation of Priest was not without it’s challenges. The method of its original manufacture suggests that it was purely experimental, and was unlikely to have ever been built to last. Certainly, it has become weaker over time, and without treatment, would have fallen into irretrievable disrepair in the not too distant future. Though the conservation treatment carried out was relatively invasive, it has ensured that the panel will remain in a stable condition for a much longer period of time, and that it is safe to display and be enjoyed by visitors to the Stained Glass Museum. This panel is particularly beautiful, and now conserved, its true beauty can be seen for the first time in over half a century, when it was last put on display. This is a brilliant example of an art student’s exploration of materials and his formation of ideas in 3D, and provides an excellent opportunity to see an early piece of work by artist, Geoffrey Clarke. The exhibition in Ely is a fitting way to remember the artist, whilst appreciating his talent and creativity, and it has been a pleasure to preserve one of his most fragile works for you to enjoy.
Before and After Conservation Photographs
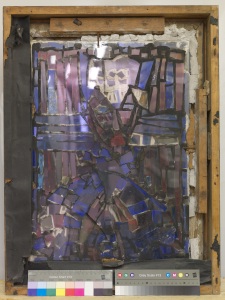
‘Priest’ (1949) – Interior Side – Before Conservation

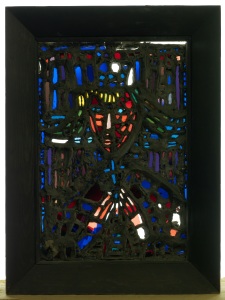
‘Priest’ (1949) – Interior Side – After Conservation
‘Priest’ (1949) – Exterior Side – Before Conservation
‘Priest’ (1949) – Exterior Side – After Conservation